Categories
Featured

Red Meat Dos and Don’ts

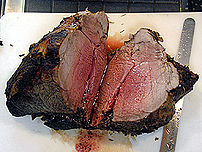
Roast beef
Image via Wikipedia

[amazon_link asins=’B01CT63964,B01M1VNJBX’ template=’ProductCarousel’ store=’finmeacur-20′ marketplace=’US’ link_id=’6ec19f6b-07b4-11e7-885e-79c240926a8c’]

[amazon_link asins=’B00CNTK2L8,031218302X’ template=’ProductCarousel’ store=’finmeacur-20′ marketplace=’US’ link_id=’8560ca55-07b4-11e7-a9f5-318bb94aa54d’]

[amazon_link asins=’B01MREYSAD,B00PE6ZTT2′ template=’ProductCarousel’ store=’finmeacur-20′ marketplace=’US’ link_id=’b3c4dbcf-07b4-11e7-968f-53d00c3f740e’][amazon_link asins=’B0118YFDLC,B003G2JEX8′ template=’ProductCarousel’ store=’finmeacur-20′ marketplace=’US’ link_id=’cfd722ab-07b4-11e7-8e73-cdb9cf3da7eb’]

* Keep your red meat consumption to 18 ounces per week or less. A handy yardstick: A typical 3-ounce serving of red meat is about the size of a computer mouse.

* Choose leaner cuts of meat, such as top sirloin beef, and trim excess fat.

* Serve meat as a side dish instead of an entree.

* Replace red meat with other protein sources, such as poultry, fish, beans or nuts.

* Use lower-temperature cooking methods such as stewing.

* If you grill, keep meat away from the coals or use a gas grill and don’t overcook.

* Women in reproductive years who eat little meat should take a multivitamin with iron to reduce the risk of iron deficiency.

Sources: Los Angles Times
Reblog this post [with Zemanta]
Categories
Yoga

Dog Yoga Pose

[amazon_link asins=’B0043LKPOI,B016CKO30Y’ template=’ProductCarousel’ store=’finmeacur-20′ marketplace=’US’ link_id=’1b0121dd-0997-11e7-a028-6d0cf60c3693′]

Variation on dog yoga pose adds flexibility:

This exercise takes a classic yoga pose to a new level. If you’re already familiar with downward facing dog and flexible enough to do it correctly, then challenge your body with this variation
click to see
Step 1. Beginning on your hands and knees, place the heels of your hands directly below your shoulders and your knees below your hips. Curl your toes under, lift your hips and press your heels toward the floor as far as you can. Straighten your knees and bring your head and chest toward your thighs. If possible, have your ears between your arms. Take three to four breaths in this position.


Step 2. Slowly shift your weight over your left arm, keeping equal weight over both feet. Once you find your balance, reach your right hand toward your left leg. Grasp your left ankle, twisting your upper spine slightly to bring your right shoulder closer to your left thigh. Focus on stretching your toes forward and your heels back. Take three to four slow breaths in this position. Place your right hand on the floor and repeat on the other side.

Sources: Los Angles Times

Enhanced by Zemanta
Categories
Yoga

Chair Poses

[amazon_link asins=’B01KGO2VX8,B01MZ03PS5′ template=’ProductCarousel’ store=’finmeacur-20′ marketplace=’US’ link_id=’04f3e8ba-0995-11e7-861e-334bb7942cb5′]

Chair Poses Improve Yoga Techniques:-

If you’re new to yoga, here’s a way to modify the classic chair pose. Practice half-chair for a while before progressing to the more challenging full chair position. This gives you a chance to learn proper technique without developing bad habits.

click to see

Step 1 Stand with your feet together and with your hands by your sides. As you inhale, sweep your arms up and bend your knees. Sit back on your heels with your hips moving behind your heels. Grasp your forearms above your head. Drop your shoulders down and away from your ears and look forward. Make sure you keep your heels on the floor with your knees together and your abdominals pulled in. Take three to six slow full breaths. Come out of the pose by straightening your legs and lowering your arms.

Step 2 As you feel more competent and become comfortable doing the half chair, continue to squat deeper toward the floor. Straighten your arms overhead, pointing your fingertips toward the ceiling. Remember to relax your shoulders down. Sit as low as you can with your knees together and your heels on the floor. Hold for three to six full breaths.

Sources:Los Angles Times

Enhanced by Zemanta
Categories
Exercise

Stretch Loosens up Spine and Hips

[amazon_link asins=’0553277480,B0043LKPOI,B00X9K8F0A,1607439425,B01CTRKNVC,B00807RTZO,B073NMKSTN,B072FGS9G7,B00FO9U46W’ template=’ProductCarousel’ store=’finmeacur-20′ marketplace=’US’ link_id=’d6fbf622-6f6b-11e7-aa69-e796bf8744d0′]

Use this stretch to release your back and hips if you’ve been seated for a long period of time or after brisk walking, hiking or biking. You’ll stand taller and feel more energized once your spine and hips have been loosened up.

Step 1.

Sit on the floor or a padded mat. Bend your knees out to the side with the soles of your feet pressed together in front of you. Place your hands behind you on the floor, close to your hips, with fingers turned away from your body. Lift your spine tall without overarching your lower back. Allow your thighs and knees to drop to the floor.

Step 2.

Reach forward with your hands, grasping your feet. On an exhale, round your back, bringing your face close to your feet. Hold this position for 30 to 60 seconds while you focus on breathing deeply and fully. Think of expanding your entire back when you inhale, then letting go of all tension when you exhale.

Sources:Los Angles Times

Zemanta Pixie
css.php