Categories
Yoga

Padmasana (Yoga Exercise)

CLICK TO SEE THE PICTURES…….(1)…..(2).….

[amazon_link asins=’B017TP9MTS,B000GRU8UY’ template=’ProductCarousel’ store=’finmeacur-20′ marketplace=’US’ link_id=’f79ead1e-f0ca-11e6-b62d-d92b8316a6c6′]

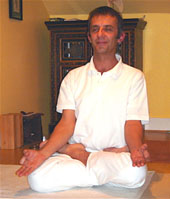
Padma means lotus in Sanskrit, in this .asana position of the legs look like blooming lotus. This asana has been given a great importance in the Yogashastra as it is best suited for Pranayam, Meditation & concentration.
Pre position: Sitting Position as shown in the 1st. picture.

How to do this (step by step):
1. Spread both the legs and keep them at a distance of 1 to 1.5 feet.
2. Bend left leg in knee and place its toe on the right thigh and heel on the groin of the left leg.
3. Bend right leg in knee and place its toe on the left thigh and heel on the groin of the right leg.
4. Keep the wrists of both the hands on the respective knees and take Dnyana Mudra. Continue normal breathing.

Position In this asana: the position of the body is stabilized. Keep the backbone erect and sight straight. If the hands are long then slightly bend those in elbows. There should not be any strain on any of the muscles.
Releasing (step by step)

1. Bring the hands beside the waist.
2. Straighten the right leg in the knee.
3. Straighten the left leg in the knee.
4. Get both the legs together, take the sitting posture.

Duration: Within 10 to 12 days’ practice of this asana(exercise), one can maintain this asana for 10 minutes. After more practice this period can be increased to 2 to 3 hours. Sitting for long in this asana alone can make one experience the pleasure of this asana.
Benefits:As the backbone is kept erect in this asana, its functioning is greatly improved. Dnyana Mudra further helps in stabilizing pulse beats. Consequently strain on muscles is reduced, which in turn reduces strain on heart.
Also breathing slows down, collective effect of all this is one can achieve concentration of mind.
Precaution: This asana is very simple and anyone can practice.

Reference Book:- Yoga Pravesh

Enhanced by Zemanta
Categories
Yoga

The Peacock (Yoga Exercise)

[amazon_link asins=’B01N1PO2UG,B008OP0CPQ,B01N5H5XZN,B00T7FLW7E,B00T7FPJ0K,B01I1GIX30,B00R6GW9YQ,B0146LMBNC,B01MXLK0PR’ template=’ProductCarousel’ store=’finmeacur-20′ marketplace=’US’ link_id=’3167ee7b-7406-11e7-bf00-a366f4ec867c’]

Benefits
1.Highly beneficial for indigestion ,flatulence and allied problems, as the weight of the body presses the elbow into the upper abdomen, massaging the pancreas and spleen.

2.It strengthens the waist ,arms,lungs,ribs and heart.

How to do the exercise:...CLICK & SEE
1.Sit back on your heel with knees apart. Place your palms on the floor, fingers pointing back toward your feet.

2.Using your arms bend forward and place the top of your head on the floor. Keep your elbows together, pressing into the upper abdomen.

3.Stretch your legs back one at a time, keeping the knees off the floor and the feet together. Your weight should be on your toes, hand and head. Now lift your head.Now keep the entire weight of the body on the plams,hands and elbows and maintain the balance.

4.Inhale and gently ride forward on your arms lifting your toes up and balancing on your hands. Keep your legs straight. Hold the pose as long as possible, breathing normally, then exhale and release it, coming down on your toes.

It is a difficult exercise, it should be practiced with patience.You must be careful in maintaining the balance of the body parallel to the ground.

Inthe begining do it for 4 to 5 seconds return to former position and inhale, relax and breathe normally.

Source:Allayurveda.com

Categories
Yoga

The Triangle (Yoga Exercise)

[amazon_link asins=’B0769Q367R,B01N2GG3SX,B071SDN5H8,B071LPR3QB,B06XKC6BXW,B071LCV7KJ,B00CMQZQUE,B01CTRKO6Q,B071LG6ZK1′ template=’ProductCarousel’ store=’finmeacur-20′ marketplace=’US’ link_id=’a57807de-b8ce-11e7-b690-ed76fceed891′]

Benefits

Gives an excellent lateral stretch to the spine, tones the spinal nerves, helps in the proper functioning of the digestive system. It makes the body flexable.

How to do the exercise:

click to see the picture

1.Stand with your feet well apart (about 3-4 feet). Point your left foot to the left, and your right foot slightly to the left. Stretch your left arms out at shoulder level and bring the right arm straight up, against your right ear. Now inhale.

.
2.As you exhale, bend to the left and slightly forward to bypass your ribs. Slide your left hand down your left leg and hold on to the lowest part you can reach. Look out at your right hand. Take several full breaths in this position before releasing it. Repeat, bending to the right.

Source:Allayurveda.com

Enhanced by Zemanta
Categories
Yoga

The Headstand(Yoga Exercise)

[amazon_link asins=’B000BNKYCK,B01CZ75MI0,B01DZ1PSIE,B00IY2K1NW,B06XZVW8SS,B01M7QXBEJ,B071W2Z9BG,B01N9NMH0F,B06Y41V19Z’ template=’ProductCarousel’ store=’finmeacur-20′ marketplace=’US’ link_id=’88b22672-82fe-11e7-882f-87636a0436cf’]

Benefits

Aids in circulation, Relieves pressure on the lower back Improves memory, concentration and the sensory faculties.It helps to improve eyesight defect, dental illness, headache, histeria and nurve disease.

Description :
King of asanas, the Headstand or Sirshasana is one of the most powerfully beneficial postures for both body mind.

How to do the exercise: >...CLICK & SEE THE PICTURES

1. Kneel down and rest your weight on your forearms, Wrap your hands around your hands around your elbows.
2. Release your hands and place them in front if you , with fingers interlocked. Your elbows now stay in this position.
3. Place the back of your head in your clasped hands and the top of your head on the floor.The hands and elbows from a tripod, making a firm foundation for the inverted body.
4. Now straighten your knees and raise your hips.
5. Without bending the knees, walk your feet in as close to your head as possible. Pull your hips back so that your neck is not bent backward or forward, but is in straight line with the spine.
6. Bend your knees in to your chest and lift your feet of the floor pulling your hips backward as you do so. Pause at this point do not immediately attempt to raise your knees higher.
7. Then, keeping your knees bent, lift them up toward the ceiling, using your abdominal muscles.
8.Now slowly straighten your legs. You will feel most of the body’s weight on the forearms. To come down, reverse steps 5, 6 and 7. Rest in the Child’s pose for at least six deep breaths.
Cautions
People with high BP, glaucoma or a detached retina should avoid head stand exercise.

FOR BEGINNERS :This exercise should be practised under the guidance and supervision of an expart only.

Source:Allayurveda.com

Categories
Ailmemts & Remedies

Knee pain

Left knee-joint from behind, showing interior ...
Image via Wikipedia

Common Causes

Knee pain usually results from overuse,but in several cases poor form during physical activity, not warming up or cooling down, or inadequate stretching. Simple causes of knee pain often clear up on their own with self care. Being overweight can put you at greater risk for knee problems.

Other Knee pain causes :-

  • Arthritis — including rheumatoid, osteoarthritis, and gout, or other connective tissue disorders like lupus.
  • Bursitis — inflammation from repeated pressure on the knee (like kneeling for long periods of time, overuse, or injury).
  • Tendinitis — a pain in the front of your knee that gets worse when going up and down stairs or inclines. Happens to runners, skiers, and cyclists.
  • Baker’s cyst — a fluid-filled swelling behind the knee that may accompany inflammation from other causes, like arthritis. If the cyst ruptures, pain in the back of your knee can travel down your calf.
  • Torn cartilage (a meniscus tear) — can cause pain on the inside or outside of the knee joint.
  • Torn ligament (ACL tear) — can cause pain and instability of the knee.
  • Strain or sprain — minor injuries to the ligaments caused by sudden or unnatural twisting.
  • Dislocation of the kneecap.
  • Infection in the joint.
  • Knee injuries — can cause bleeding into your knee, which worsens the pain.
  • Hip disorders — may cause pain that is felt in the knee. For example, iliotibial band syndrome is injury to the thick band that runs from your hip to the outside of your knee.

Less common conditions that can lead to knee pain include the following:

Home Care

Many causes of knee pain, especially those related to overuse or physical activity, respond well to self-care:

  • Rest and avoid activities that aggravate the pain, especially weight bearing activities.
  • Apply ice. First, apply it every hour for up to 15 minutes. After the first day, apply it at least 4 times per day.
  • Keep your knee elevated as much as possible to bring any swelling down.
  • Gently compress the knee by wearing an ace bandage or elastic sleeve. Either can be purchased at most pharmacies. This may reduce swelling and provide support.
  • Take acetaminophen for pain or ibuprofen for pain and swelling.
  • Sleep with a pillow underneath or between your knees

YOGA EXERCISE

Several kind of knee pain problem can be cured through yoga exercise under some Yoga Expart.

css.php