Categories
Herbs & Plants

Redshank

Botanical Name :Adenostoma sparsifolium
Family : Rosaceae
Kingdom: Plantae
Division: Magnoliophyta
Class: Magnoliopsida
Order: Rosales
Genus: Adenostoma
Species: A. sparsifolium

Common Name: Red shank, Ribbon bush,Ribbonwood

Habitat: South-western N. AmericaSouthern California.  Grows in chapparal at elevations of 300 – 2500 metres[

Description:
Adenostoma sparsifolium is an evergreen Shrub growing to 6m.It is a multi-trunked tree or shrub native to dry slopes or chaparral of Southern California and northern Baja California. Shaggy falling shanks or ribbons of bark are one of the strongest characteristics of the tree, hence the common names. Redshanks are closely related to the more abundant Chamise (Adenostoma fasciculatum).

You may click to see the picturs..

It is an annual to tree.
Leaves simple to pinnately to palmately compound, generally alternate; stipules free to fused, persistent to deciduous
Inflorescence: cyme, raceme, panicle, or flowers solitary.

Red shanks grows from the San Luis Obispo/Santa Barbara County line south in chaparral, down through the L.A. basin in coastal sage scrub and up on the edge of the pine forests in many areas like Mountain Center and Wheeler Springs.. It looks something like a tamarisk in fruit and flower. In the upper Malibu area the frequent fires and post-fire seeding of grasses have destroyed most of the plants. Red Shanks makes the area look like something from a James Bond movie shot in Africa or Captain Kirk on an alien planet, or Korea if you watch a MASH rerun. If pruned a little and opened up it makes a very dramatic small tree. Weird that it is not as wide ranging as it’s cousin Chamise, but it is as easy to grow and very tolerant of most garden conditions.

Flower generally bisexual, radial; hypanthium free or fused to ovary, saucer- to funnel-shaped, often with bractlets alternate with sepals; sepals generally 5; petals generally 5, free; stamens (0)5–many, pistils (0)1–many, simple or compound; ovary superior to inferior, styles 1–5
Fruit: achene, follicle, drupe, pome, or blackberry- to raspberry-like
Seeds generally 1–5

It is hardy to zone 8. It is in leaf all year, in flower from May to June. The flowers are hermaphrodite (have both male and female organs) and are pollinated by Insects.

The plant prefers light (sandy), medium (loamy) and heavy (clay) soils, requires well-drained soil and can grow in nutritionally poor soil. The plant prefers acid, neutral and basic (alkaline) soils. It cannot grow in the shade. It requires dry or moist soil and can tolerate drought.

Cultivation :-
Requires a sheltered sunny position in a well-drained soil and protection from cold winds. Plants are not very hardy in Britain and do not withstand exposure to prolonged winter frosts though they succeed outdoors in the milder areas of the country. In colder areas they are best grown against a south or south-west facing wall. The leaves are resinous and catch fire easily. They have a pleasant aroma.

Propagation:-
Seed – we have no information for this species but suggest sowing the seed in a greenhouse in early spring. When large enough to handle, prick the seedlings out into individual pots and grow the plants on for at least their first winter in a greenhouse or cold frame, planting them out in late spring or early summer, after the last expected frosts. Cuttings could be tried in August of half-ripe wood, preferably with a heel, in a frame. Layering.

Medicinal Uses:
The plant is cathartic. The plant has been used externally in the treatment of arthritis. An infusion of the leaves has been used in the treatment of colds and chest complaints, and also as a mouth wash to treat toothaches. An infusion of the dried leaves, or the branches, has been used in the treatment of stomach ailments, inducing either bowel movements or vomiting. The crushed twigs have been mixed with oil and used as a salve.

Other Uses
The bark is fibrous and has been stripped off the plants to make women’s skirts. The wood has been used to make fencing posts and as construction material. The wood burns well, giving a high intensity heat.

Disclaimer:The information presented herein is intended for educational purposes only. Individual results may vary, and before using any supplements, it is always advisable to consult with your own health care provider.

Resources:
http://www.pfaf.org/database/plants.php?Adenostoma+sparsifolium
http://plants.usda.gov/java/profile?symbol=ADSP&photoID=adsp_004_ahp.jpg
http://en.wikipedia.org/wiki/Adenostoma_sparsifolium
http://ucjeps.berkeley.edu/cgi-bin/get_JM_treatment.pl?6677,6681,6683
http://www.laspilitas.com/nature-of-california/plants/adenostoma-sparsifolium

Categories
Exercise Healthy Tips

Keep Fit in 30 Minutes or Less

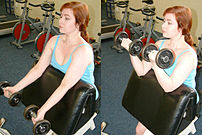
The biceps curl is sometimes performed on the ...
Image via Wikipedia

[amazon_link asins=’B00DDC22QW,B01DJBCN3I,B00TQAYEVQ,B01DXSBEQE’ template=’ProductCarousel’ store=’finmeacur-20′ marketplace=’US’ link_id=’149ede86-480d-11e7-b340-739aa17cab5b’]

Between parties and shopping, time is short these days. But that doesn’t mean your exercise routine has to be second-rate. A 20- to 30-minute workout done at a high intensity can increase the heart rate and tone muscles equally as well as a longer workout done at a lower intensity.

“Who made the rule that a workout has to be an hour?” asks Amy Dixon, group fitness manager at Equinox in Santa Monica. “If people can wrap their heads around the fact that it’s OK to do a shorter workout, especially if you do it right, that’s all you need.”

The key, these trainers say, is to keep moving. Taking breaks between exercises — even short ones — will lower the heart rate and not provide as much calorie burn. While some of these routines require equipment such as cardio machines or light weights, you can easily make your substitutions. Run at a nearby track, park or playground and use stairs and bars for exercises such as pull-ups. Use soup cans for weights. And scale back or increase the level of intensity according to your fitness level. No need to be a superhero — or a slug — just because it’s the holidays.

Angela Stovall
(Master trainer at 24 Hour Fitness in Chino)

We’d start with five minutes of cardio, and that could be on a machine such as an elliptical trainer, a stair climber or a treadmill. If you’re exercising first thing and using this as a warm-up, do it at a low intensity. If you’re already warmed up, choose a moderate to vigorous intensity that gets your heart rate up.

Then do walking lunges for five minutes. This uses all the leg muscles, is a great fat burner and gets your heart rate up. You’re also using your core. If you’re a beginner, do stationary lunges, holding onto a chair if necessary. After doing 10, alternate between those and 10 ab crunches. Do three sets of each.

Get on the treadmill for five minutes at 3.5 miles per hour (or a moderately fast pace — not a slow walk). At the same time, do biceps curls and shoulder presses with light weights (3 to 5 pounds), or no weights. When you do this while you’re moving, you get a better calorie burn and you’re toning the muscles. You should always concentrate on your form. For beginners, only do this if you’re comfortable on the treadmill, and slow the speed if necessary.

Next, go to a mat and do push-ups — straight-legged if you’re advanced, or on your knees if you’re not. Do 10 to 20 depending on how conditioned you are. Alternate those with triceps bench dips on a chair, also doing 10 to 20. Do three sets of each.

Then it’s on to the StepMill (a stair climber with rotating steps) for five minutes. You can push it here a little bit because you’re warmed up, but beginners who have never done this before can stay at Level 1. If that machine isn’t available, you can use another form of stair climber, or just go up and down some stairs.

After that, do 25 standing squats with no weight, then 50 side bends. For the side bends, stand with feet hip-width apart and bend your torso from side to side, trying to reach below your knees. This is for the obliques. This also brings down the heart rate a little bit.

Amy Dixon
(Exercise physiologist and group fitness manager at Equinox, Santa Monica)

With only 20 to 30 minutes, I would do a treadmill workout that’s interval-based, alternating bouts of resting and pushing. You’re going to burn the most calories, get your heart rate up and spike your metabolism.

For beginners, walk on the treadmill at a comfortable but challenging pace, and up your intensity with the incline. When you’re pushing, it won’t feel easy. If you’re starting to feel uncomfortable, you’re in the upper end of your endurance zone, so stay there and get to know what it feels like. You shouldn’t feel like you have to step off the treadmill to catch your breath. When you come down to a slower pace, you’ll feel a little spike in your heart rate, but then you should be able to ride it out.

If you’re more advanced and want to run, keep your speed between 5 to 7 miles per hour and start at a 3% incline before increasing to about an 8% incline. If you’re in better condition, you should be breathless on the push.

For all fitness levels, try alternating between two minutes of the easy phase and a minute of the difficult phase. Do this workout a maximum of three times a week if you’re fit. For beginning exercisers or those who haven’t done intervals before, do it twice a week. If you don’t have a treadmill and can go outside, do hills for the hard part of the intervals, or push the pace. This can also be done on an elliptical trainer or stationary bike.

Sharon Phillips
(Personal trainer at Crunch, Los Angeles)
I like to do short workouts, circuit-training style, moving at a relatively quick pace to keep the heart rate up, and incorporating plyometrics. Each of these sets should take about a minute, and the entire circuit should be done three times. By the third set you’ll be pretty fatigued. You still want to push yourself, but also pace yourself.

For warm-ups, do sprints with push-ups. Run about the length of half a basketball court, then drop and do 10 push-ups, sprint to the other end and do 10 more push-ups. Or, run in place for 30 seconds, keeping knees high, and drop into push-ups.

Then do squats into a shoulder press using dumbbells that are a comfortable weight, or just your body weight. With feet shoulder-width apart, go into a squat position holding the dumbbells, come up and do a biceps curl with both arms, and then go into a shoulder press. Bring the weights back down and go back into a squat. For another version, go into a squat, jump into the air, come back down into a squat position again, put your hands on the ground and kick your feet out behind you, then bring them back in.

Walking lunges with a twist are next. If you have a medicine ball or other weighted object, hold it out in front of you, arms straight and at shoulder height. Twist toward the leading leg so you get a contraction in your obliques. You can also do this with no weights, but still holding your arms up. If there’s no room to do walking lunges, do them in place and alternate legs, doing the twist.

Then do a round of leapfrogs, which is a plyometric exercise. Start in a squat position, lean forward and jump, landing softly so you don’t injure your knees. If there’s no open space, just do jump squats in place, and again be careful with your knees. Your arms can be used for momentum, so swing them as you jump.

Pull-ups are next, and you’ll need a bar, which you can find at a gym or a park. Sometimes gyms have assisted pull-up machines, which make this a little easier. This exercise really engages the core.

Now do full-body crunches with a Body Bar (a long, weighted bar), a ball or with no weight. Lie on the floor with arms and legs extended and bring the elbows and knees together. Extend them out again, keeping them about an inch off the floor.

Sources: Los Angeles Times

Reblog this post [with Zemanta]
Categories
Pediatric

How To Prevent Diaper Rash

 CLICK & SEE

It has been said that if there were no diapers, there would be no diaper rashes. Even with meticulous care, all infants will occasionally develop an irritated bottom. Preventing the rash is a parent’s goal, but if an infant does get one, home treatment will usually keep the irritation from turning into more than just a nuisance.

CLICK & SEE.>..diaper rashes

Diaper rashes are actually caused by a combination of factors. First and foremost, the area under a diaper is warm, moist, and poorly ventilated, conditions ideal for the development of a rash. Second, the infant’s outermost layer of skin is soft and thin, making it highly susceptible to injury from bacteria, fungi, and the chemicals found in urine and stool. Third, the sequence of wetting and drying makes the skin more susceptible to the constant rubbing of a diaper against the skin. Add other conditions, such as skin or food allergy, diarrhea, and the use of medications (antibiotics, for example) it’s a wonder that a baby’s bottom is not always irritated.

Remember, diapers are used to keep urine and stool off the infant’s clothes and environment. Since all babies must wear diapers, the best any parent or caregiver can do is to try to prevent a rash from developing. Parents usually discover through trial and error just which diapering routines or products work best for their infant.

Here are some suggestions that will help:

· Never leave a baby alone on the changing table or any surface above the floor. Even a newborn can make a sudden turn and fall. Keep all supplies together in one place so the infant is always attended.

· Make sure the baby is always clean and dry. Promptly change the infant whenever the diaper is wet or soiled and gently clean the area with a soft washcloth. Do not over clean as scrubbing only damages the skin. Avoid harsh soaps – water alone is probably all that is needed. Gently pat the diaper area with a soft towel and leave the area exposed to air for a few minutes before putting on a new diaper. When the skin is completely dry, apply a light diaper cream containing zinc oxide. Although these white creams are not totally necessary, they do create a barrier so that stool and urine will not irritate the skin.


  • Choose diapers that have sufficient absorbency to keep the baby dry longer. Some of the new disposable diapers have chemicals that draw moisture away from the skin. These diapers absorb tremendous amounts of fluids – I recently took my 17-month old granddaughter swimming and her diaper weighed more than her when we got out of the pool! Change brands if a particular disposable diapers irritates the child.

  • Keep diapers and outer clothing fitting loose. The tighter the diaper and clothes, the less air gets to the baby’s skin.

  • Talcum powders should not be used. If babies inhale the powder, it can irritate the lungs and cause pneumonia. Cornstarch based powders may be less dangerous, but are not necessary since the new disposable diapers have a smooth inner lining.

Additional measures parents can take once a rash appears include:


  • Remove the diapers whenever possible. Fresh air is a great healer and without urine and stool touching the skin, the rash might clear up on its own. To keep any mess to a minimum, place the child diaperless on a surface that is easily washed or lay the baby down on soft towels with a waterproof sheet underneath. When the weather is nice, a few minutes’ exposure to sunshine may be helpful.

  • Disposable diapers can be altered to breathe easier by snipping the elastic bands around the legs in several places. Tearing holes in the plastic liner of the disposable diaper will also help allow more air in.

  • The diapers should be changed even more frequently than before. Until the rash is better, wake the baby up at least once during the night to change a wet diaper.

  • Instead of wiping the baby’s skin with a washcloth, use a running stream of plain water from the sink or a squeeze bottle. A cotton ball dipped in baby oil will gently remove any remaining diaper cream or stool from the irritated skin. Pat the area thoroughly dry before applying a new layer of diaper cream so that the medication does not seal in any moisture.

  • Avoid baby wipes since they contain alcohol, perfumes, and other chemicals that will irritate already inflamed skin. Sometimes the less applied to the baby’s skin the better off the infant will be!

  • Sometimes a diaper rash is caused by a yeast infection. This type of irritation is usually bright red, covers a large area, and is surrounded by red dots. Yeast diaper rashes are frequently seen following bouts of diarrhea or after a child has been on antibiotics. An over-the-counter antiyeast medication, such as MonostatR may be helpful, or see the child’s pediatrician for a prescription cream.

Most diaper rashes can be treated at home and usually clear up in three to five days. However, if the baby’s bottom becomes raw, bleeds, develops blisters or open sores, spreads beyond the diaper area, or causes enough discomfort to interfere with sleep, call the child’s physician for additional advice and help.

While diaper rashes are very common, parents still get upset and when their child’s bottom becomes red and irritated. Neighbors and relatives occasionally make parents feel guilty by reporting that their children never had a diaper rash! Parents should not blame themselves or their baby sitter when their infant develops a diaper rash. It is definitely not a reflection of poor hygiene or lack of care. True, diaper rashes are unsightly and worry parents, but given an infant’s tender skin,they are almost unavoidable!

Click to see also :->Diaper Rash Myths

Sources:KidsGrowth.Com

css.php