Categories
Yoga

Sharangat Mudra (Yoga Exercise)

[amazon_link asins=’B00MNNZMUA,B01CTRKP2O,B00FO9U46W,B017C8O80K,B016CKO30Y,B00DG9KID6,B010GB7FDC,B01MQP3TFX,B0043LKPOI’ template=’ProductCarousel’ store=’finmeacur-20′ marketplace=’US’ link_id=’6588c2bb-6a87-11e7-960d-3b47f7ea2085′]

How to do the Exercise:

CLICK & SEE THE PICTURES

SITTING POSITION:  VAJRASANA

Exhale, and inhaling raise the hands upward from the sides and join the palms.
Exhaling, bend in the waist and touch the forehead on the floor keeping the hands straight. After taking the final position, continue smooth breathing.(as shown in the picture)

Position Like Yogamudra here too the abdomen gets folded. Further, attempt should be made to have this fold as compl

ete as possible. The frontward stretched arms greatly help in getting this fold. However, the hands should be kept as much outstretched as possible.
Keep the knees resting on the floor and the spinal column straight.
Place the forehead on the floor at farthest distance from the crossed legs. While outstretching the hands, keep the arms touching the ears. Keep the breathing normal.

Releasing : Exhale, and inhaling start raising the arms, neck and the trunk and straighten it in the waist. Keep the hands outstretched above the head.
Exhaling, bring both the hands down from the sides and take up Dhyana Mudra.

Duration: This Asana(exercise) should be maintained at least for one and half minute to have the desired benefits. After practice this duration can be increased to three minutes.
Benefits: This Asana prepares the Sadhaka mentally for the desired submission to the Almighty God.
Precaution: YOGA  EXERCISE SHOULD BE DONE UNDER THE GUIDELINE OF SOME EXPERT

Reference Book:- Yoga Pravesh

Categories
Yoga

Padmasana (Yoga Exercise)

CLICK TO SEE THE PICTURES…….(1)…..(2).….

[amazon_link asins=’B017TP9MTS,B000GRU8UY’ template=’ProductCarousel’ store=’finmeacur-20′ marketplace=’US’ link_id=’f79ead1e-f0ca-11e6-b62d-d92b8316a6c6′]

Padma means lotus in Sanskrit, in this .asana position of the legs look like blooming lotus. This asana has been given a great importance in the Yogashastra as it is best suited for Pranayam, Meditation & concentration.
Pre position: Sitting Position as shown in the 1st. picture.

How to do this (step by step):
1. Spread both the legs and keep them at a distance of 1 to 1.5 feet.
2. Bend left leg in knee and place its toe on the right thigh and heel on the groin of the left leg.
3. Bend right leg in knee and place its toe on the left thigh and heel on the groin of the right leg.
4. Keep the wrists of both the hands on the respective knees and take Dnyana Mudra. Continue normal breathing.

Position In this asana: the position of the body is stabilized. Keep the backbone erect and sight straight. If the hands are long then slightly bend those in elbows. There should not be any strain on any of the muscles.
Releasing (step by step)

1. Bring the hands beside the waist.
2. Straighten the right leg in the knee.
3. Straighten the left leg in the knee.
4. Get both the legs together, take the sitting posture.

Duration: Within 10 to 12 days’ practice of this asana(exercise), one can maintain this asana for 10 minutes. After more practice this period can be increased to 2 to 3 hours. Sitting for long in this asana alone can make one experience the pleasure of this asana.
Benefits:As the backbone is kept erect in this asana, its functioning is greatly improved. Dnyana Mudra further helps in stabilizing pulse beats. Consequently strain on muscles is reduced, which in turn reduces strain on heart.
Also breathing slows down, collective effect of all this is one can achieve concentration of mind.
Precaution: This asana is very simple and anyone can practice.

Reference Book:- Yoga Pravesh

Enhanced by Zemanta
Categories
Yoga

Some Basic Movements In Yoga Exercise

There are several joints in our body, which needs lubrication and movements. The food we consume supplies the lubrication and Yoga and other activities provide the movements. In our regular life some of these joints are overused and some are rarely used which may create problems at later stage in your life. To help these joints maintain their healthy condition Basic Movements are necessary also they are useful to prepare your body to take up Yoga.

Benefits :
1.As your body relaxes all your muscles also relax except those muscles, which are used in the movements, so one can easily concentrate on the movement / particular muscle (effort).
2. Aged and persons having diseases also can do these movements without much strain.
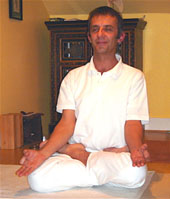
Standing Position Yoga Postures or Asana(Exercise) in standing position: click & see


Stand erect with the feet quite close together, heels and the big toes touching each other. Hands touching thighs, this position helps achieve stability of pulse.

Neck Movement-1 ...click & see

Benefit: To increase the flexibility and stamina of neck muscles.
Procedure – Standing (as shown in the picture) Position, keep your neck straight, then slowly but without jerk bend your neck forward as much as possible, back to normal position then bend it backward and then back to normal, then to the right and to the left.

Precaution: – People with neck problems like spondilytis should avoid forward bending.
Neck Movement- 2 ...click &  see

Benefits: To increase the flexibility and stamina of neck muscles.

Procedure:
– Standing Position(as shown in the picture), keep your neck straight, then slowly but without jerk start rotating neck clockwise from left shoulder to backwards then to the right shoulder and to front. Repeat this in anticlockwise direction starting from right shoulder.

Precaution: – People with neck problems like spondilytis should avoid forward bending.

Shoulder Movement1

Benefits – To increase the flexibility and stamina of shoulder & back muscles. This posture is useful for people with back problems.
Procedure :– Sit in the Vajrasana Position, keep your body straight, with arms by side. Then slowly but without jerk lift your both shoulders upwards as much as possible near to ears, back to normal position.
Precaution: – No specific precautions.

Shoulder Movement -2
Benefits :– This posture is useful for people with back problems.- To increase the flexibility and stamina of shoulder and back muscles.
Procedure :- Sit in the Vajrasana position, keep your body straight, fold you hands and place left fist on left shoulder and right fist on right shoulder, bring both your elbows together near chest, then slowly but without jerk rotate both these arms in opposite direction, (left arm anticlockwise and right arm clockwise) Repeat this in opposite direction (right arm anticlockwise and left arm clockwise).
Precaution :– No specific precautions.

Hand Movement- 1

CLICK & SEE

Benefits :- This posture is useful in increasing the strength of neck, shoulders and the stretching helps retain normal posture. To increase the flexibility and stamina of hand & shoulder muscles.

Procedure :- Relax in Shavasana position, keep your hands 6 inches away from your body, legs separated with 12 inch distance between them, lift your hands 1 to 1.5 inch above ground and slowly rotate them towards head without bending elbows, keep the hands parallel to the ground till both the palms meet, place left palm on right palm and stretch hands upwards and legs downwards for 5 to 10 seconds, then slowly but without jerk rotate both the hands back to the normal position via the same path.
Precaution :- If you feel strain while lifting your hands above ground then do this with your hands resting on ground.

Hand: Movement -2

Benefits: – This posture is useful in increasing the strength of neck, shoulders and hands, the stretching helps retain normal posture. To increase the flexibility and stamina of hand & shoulder muscles.
Procedure – Relax in Shavasana position, keep your hands 6 inches away from your body, legs separated with 12 inch distance between them, raise your hands above ground and slowly take them towards head without bending elbows, place both hands on the ground, stretch hands upwards and legs downwards for 5 to 10 seconds. Then slowly but without jerk bring both the hands back to the normal position via the same path.
Benefits :- This posture is useful in increasing the strength of neck, shoulders and hands, the stretching helps retain normal posture.
Hand: Movement- 3

Benefits :– This posture is useful in increasing the strength of neck, shoulders and the stretching helps retain normal posture. – To increase the flexibility and stamina of hand & shoulder muscles.
Procedure :- Relax in Shavasana position, keep your hands 6 inches away from your body, legs separated with 12 inch distance between them, lift your hands 1 to 1.5 inch above ground and slowly rotate them towards head without bending elbows, keep the hands parallel to the ground till both forearms cross, in this same cross position raise the arms above and on to the stomach, then slowly bring both the hands back to the normal position.

Precaution :- If you feel strain while lifting your hands above ground then do this with your hands resting on ground. The movements should be slow and continuous.

Leg Movement -1

CLICK & SEE

Benefits: – This helps development of the leg muscles and hip joints.- To increase the flexibility and stamina of legs & hip muscles.
Procedure :- Relax in Supine position, keep your hands around head rotating them side ways, then lift your left leg and bring it near to the hip, repeat this procedure for the right leg. Then slowly bring both the hands back to the normal position.
Precaution: – The movements should be slow & continuous.

Leg Movement -2
Benefits :– This helps leg muscles and hip joints. To increase the flexibility and strength of legs & hip muscles.
Procedure: – Relax in Supine position, keep your hands close to your body, then lift your left leg 30 to 40 degrees above ground level and rotate it in the clockwise direction without bending knees, repeat this procedure for the right leg.
Precaution: – The movements should be slow & continuous. Do not bend the knees.

Leg Movement-3

Benefits – This helps leg muscles and hip joints.To increase the flexibility and stamina of legs & hip muscles.
Procedure – Relax in Supine position, Move your hands around and place them at shoulder height, parallel to the ground, then lift your left leg and turn it to the right side as far as possible touching the ground. Repeat this procedure for the right leg. Then slowly bring both the hands back to the normal position.
Precaution – The movements should be slow & continuous. Do not bend the knees.

CLICK & SEE THE PICTURES

Knee Movement -1

Benefits: – This helps knee joints and hip joints.To increase the flexibility and strength of knee & waist muscles.
Procedure :– Relax in Supine position, Move your hands around your head, then bend your left leg in knee and rest foot near&nbspto hips , then turn the knee to the right side as far as possible. Repeat this procedure&nbspfor the right leg. Then slowly bring both the hands back to the normal position.
Precaution :– The movements should be slow & continuous.

Knee Movement -2

Benefits: – This helps knee joints, hip joints and also the spinal column. To increase the flexibility and strength of knee & waist muscles.
Procedure – Relax in Supine position, Move your hands around your head, then bend your legs in knee and rest feet near to&nbsphips , then turn the legs to the left side as far as possible, touch the left knee to the ground and turn the neck to the right side and relax all the muscles, continue normal&nbspbreathing, then slowly bring both the hands back to the normal position.
Precaution :– The movements should be slow & continuous, don’t take unnecessary strains while performing this exercise.

Knee Movement- 3
Benefits – This helps knee joints, hip joints and also the spinal column.- To increase the flexibility and strength of knee & waist muscles .
Procedure – Relax in Supine position.
Move your hands around your head, then bend your legs in knee and rest feet near to hips , keep 12 inches distance between them, then turn the left leg to the right side to touch the right toe, press the right leg to the left thigh, relax all the muscles,&nbspcontinue normal breathing. Repeat this for right leg, then slowly bring both the hands&nbspback to the normal position.
Precaution – The movements should be slow & continuous, don’t take unnecessary strains while performing this exercise.

Source:www.yogapoint.com

Enhanced by Zemanta
Categories
News on Health & Science

Iyengar yoga improves immunity

[amazon_link asins=’0863184200,B01G35UZCS,B00NEFXVM2,B00IRWIQV8,B000HDMM2E,B003957ITY,B01N22560H’ template=’ProductCarousel’ store=’finmeacur-20′ marketplace=’US’ link_id=’79ffce60-bf86-11e7-9eed-250dc59fb83c’]

A study, conducted by researchers at the Washington State University, has found that the immunity
system of breast cancer survivors improved significantly after practising the Iyengar form of yoga.

CLICK & SEE

Created by B K S Iyengar, based on the traditional eight limbs of yoga as expounded by Patanjali in his Yoga Sutras, this yoga form emphasises the development of strength, stamina, flexibility and balance, as well as concentration and meditation.

Considered to be a more active form of yoga, researchers reported on Monday at the American Physiological Society meeting in Washington DC that in breast cancer survivors, the Iyengar method not only promoted psychological well-being but also benefited the patients’ immune system.

According to lead researcher Pamela E Schultz, practising the yoga form resulted in decreased activation of an important immune system protein called NF-kB in patients, which is a marker of stress in the body.
“So it’s possible,” Schultz said, “that decreased activation of NF-kB indicates decreased stress in the body. NF-kB is activated in the body by physical or mental stress.”

Schultz randomly assigned 19 women, average age 61 years, diagnosed with stage I-III breast cancer and receiving antiestrogen or aromatase inhibitor hormonal therapy, to eight weeks of Iyengar yoga. Beginning level Iyengar yoga classes were conducted two times per week for eight weeks and included the following yoga poses: standing poses, chest and shoulder openers and inversions.

Blood sample to determine lymphocyte NF-kB activation were collected prior to and following the intervention.
“Psychosocial tests showed that the demands of illness, which reflects the burden of hardship of being a breast cancer survivor, lowered in the yoga participants. The survivors showed changes in the way their immune cells respond to activation signals. The function of genes in immune cells can be regulated by proteins called transcription factors. Transcription factor nuclear factor-kappa B (NF-kB) is linked to immune cell activation and to the stress response,” Schultz said.

Speaking to TOI, 89-year-old Iyengar said, “Similar studies in Mumbai found that certain asanas improve the quality of blood and results in better blood circulation. It also improved the production of proteins in the immune system called T-cell receptors that actually direct the immune system to attack specific targets. Immune cells that contain the engineered T-cell receptor better display targeted immunity with a few asanas.”

Cancer and its treatments are associated with considerable distress, impaired quality of life and reduced physical function, especially for women with breast cancer who receive multi-modality treatment over an extended period of time. “Yoga greatly helps to relieve and improve quality of life among cancer patients over time,” Iyengar said.

Dr Chidanand Murthy, director of Central Council for Research in Yoga, said, “A similar study conducted in AIIMS on 30 patients in 2006 found that Sudarshan Kriya and Pranayama greatly helped cut down the growth of breast cancer cells within the body. Through release of stress, adverse effects of chemotherapy were also avoided.”

Indian Council of Medical Research data shows that the incidence of breast cancer is high among Indians and is estimated that one in 22 Indian females is likely to develop breast cancer during her lifetime in contrast to one in eight in America.

According to Delhi’s latest cancer registry, breast cancer among women is rising by about 2% every year. It now affects 30 per 100,000 females.

Source:The Times Of India

Categories
Exercise Yoga

Learn Healthy Breathing

The Right Breath
click  & See
You already know how to breathe, right? You do it every moment, every day, without even thinking about. Chances are, though, your breathing technique is not as healthy as you might think.

Most of us breathe too shallowly, too quickly. Our lungs and heart would greatly prefer longer, slower, deeper breaths. This is true for general health, and it is also true for managing stress. Deep breathing helps dissipate the fight-or-flight reaction so many of us experience when we’re stressed. It sends a signal to your brain to slow down, which results in hormonal and physiological changes that slow heart rate and lower blood pressure.

You might be surprised that there are lots of big books written on breathing method. That’s because proper breathing technique is crucial for everyone from athletes to people with asthma to yoga experts. But for us regular folk, there are only a few things you need to keep in mind:

1.In general, inhale slowly and deeply through the nose. A healthy inhale takes about five seconds.

2.In general, exhale slowly through the mouth. Empty your lungs completely. Good breathers focus more on thorough exhalation than on inhalation.

Engage your diaphragm for good breathing. The diaphragm is the sheet of muscle along the top of your abdomen that pulls your lungs down to draw in air, and then pushes your lungs up to expel carbon dioxide. With a good inhalation, your lungs puff up as your diaphragm drops. With a good exhale, your diaphragm rises. If you don’t feel this muscle moving, deepen your breaths even more.

Work toward breathing just six or eight deep breaths per minute. Most of us breathe more than 20 times a minute.

Breathe Away Anxiety
Proper breathing is particularly important during moments of great anxiety. At times like these, many people resort to chest breathing — the type of big, desperate inhales and exhales that make you rapidly puff up and deflate your chest, says Michael Crabtree, Ph.D., a professor of psychology at Washington & Jefferson College in Washington, Pennsylvania, and a licensed clinical psychologist.

To regain healthy breathing during periods of anxiety, he says, lie on the floor and place your hand on your chest. Using your hand as a gauge, try to reduce the amount of chest movement, while continuing to breathe normally. You don’t want your chest to move; you want the other parts of your body to take over the breathing — using your diaphragm instead of the big chest inhales and exhales. Do this for five minutes.

Be aware that chest breathing still has a purpose, but only in times of extreme emotional arousal or physical challenge. “Most Americans use chest breathing because of developing instincts from fight-or-flight conditions,” he says. It is in those types of physically dangerous situations that it is still necessary — not for everyday stress or anxiety. Proper breathing is particularly important during moments of great anxiety. At times like these, many people resort to chest breathing — the type of big, desperate inhales and exhales that make you rapidly puff up and deflate your chest, says Michael Crabtree, Ph.D., a professor of psychology at Washington & Jefferson College in Washington, Pennsylvania, and a licensed clinical psychologist.
From : Stealth Health.

css.php